服务器准备
| IP 地址 | 主机名 | 配置 | 系统 |
|---|---|---|---|
| 10.0.0.200 | Gitlab | 2 核 4G,40G 硬盘 | Ubt (Ubuntu) |
| 10.0.0.201 | Jenkins | config1 核 2G,40G 硬盘 | kylin |
| 10.0.0.202 | Nexus | 1 核 2G,40G 硬盘 | kylin |
| 10.0.0.203 | Sonar | 1 核 2G,40G 硬盘 | kylin |
| 10.0.0.7 | Web | 1 核 1G,40G 硬盘 | kylin |
说明:服务器使用虚拟机,装载纯干净的系统。Ubt 系统的 Gitlab 安装包网站为:https://mirrors.tuna.tsinghua.edu.cn/gitlab-ce/ubuntu/pool/jammy/main/g/gitlab-ce/
笔试题:你了解 DEVOPS 吗?谈谈对它的理解
待深入分析作答,此处仅作笔记记录,后续可围绕 DEVOPS 将开发(Dev)和运维(Ops)进行融合,打破传统部门壁垒,实现高效协作;涵盖从代码开发到部署上线等多个环节;通过自动化、监控和快速反馈机制等方面,阐述其对项目开发速度、质量和稳定性等带来的积极影响。
Git 版本控制
企业常用的 Git 版本系统(页面版的代码仓库)
- GitHub:全球使用最多的代码仓库。
- GitLab:全球使用最多的私有代码仓库。
- Gitee 码云:中国使用最多的代码仓库。
Git 的使用
1.配置当前代码仓库的使用角色的信息
# 查看当前系统中安装的 Git 版本
[root@hao ~]# git --version

# 配置全局的用户名,在提交代码时会使用这个用户名来标识提交者
[root@hao ~]# git config --global user.name  "haoshuaicong"

# 配置全局的用户邮箱,同样在提交代码时会使用这个邮箱来标识提交者
[root@hao ~]# git config --global user.email  "haoshuaicong@mail.com"

# 开启 Git 命令行输出的颜色显示,这样可以让输出信息更加清晰易读
[root@hao ~]# git config --global color.ui  true

# 列出当前 Git 的所有配置信息,包括全局配置和本地仓库配置(如果有)
[root@hao ~]# git config --list
2.初始化代码仓库
# 创建名为 git_data 的目录并进入该目录
[root@hao ~]# mkdir git_data && cd git_data

# 初始化 Git 仓库
[root@hao ~/git_data]# git init

# 进入 Git 仓库的.git 目录
[root@hao ~/git_data/.git]# cd /root/git_data/.git

# 查看.git 目录下的文件和文件夹信息
[root@hao ~/git_data/.git]# ll
drwxr-xr-x 2 root root 4096 Feb 17 09:58 branches/  # 分支
-rw-r--r-- 1 root root 92 Feb 17 09:58 config      # 配置文件
-rw-r--r-- 1 root root 73 Feb 17 09:58 description # 描述
-rw-r--r-- 1 root root 23 Feb 17 09:58 HEAD        # 头部
drwxr-xr-x 2 root root 4096 Feb 17 09:58 hooks/    # 勾子
drwxr-xr-x 2 root root 4096 Feb 17 09:58 info/
drwxr-xr-x 4 root root 4096 Feb 17 09:58 objects/  # 项目代码放此目录但是不是明文的 HASH
drwxr-xr-x 4 root root 4096 Feb 17 09:58 refs/     # 缓存区
3.Git 区域名称
- 工作目录:进入
git_data目录,当前的位置称为工作目录,类似车间工人的工作区域。开发人员在此编写代码。 - 暂存区域:临时存放代码的区域,类似质检车间。有问题的代码可以返回工作目录修改,没有问题的代码可以保存到本地仓库。
- 本地仓库:存储代码的位置,类似工厂仓库。代码从工作目录提交到暂存区域,再提交到本地仓库后,才真正被 Git 管理。每次完成从工作目录到本地仓库的代码提交流程,相当于虚拟机做了一个快照的动作。例如,
1.txt文件从工作目录经暂存区域最终提交到本地仓库,实现文件的版本管理。
Git 常用命令
1. Git 初始化
- 必须在工作目录
git_data执行,使用如下命令进行初始化:
git init2. 查看 Git 仓库状态
- 同样必须在工作目录
git_data执行,用于查看仓库当前状态:
git status3. 将文件保存到本地仓库的流程
- 创建文件:使用
touch命令创建新文件。 - 提交到暂存区:使用
git add命令将文件添加到暂存区。 - 将暂存区的内容提交到本地仓库:使用
git commit命令将暂存区的内容提交到本地仓库,同时需要添加提交信息。 - 提交完成后检查工作状态:使用
git status命令检查工作目录是否干净。
示例如下:
[root@hao ~/git_data]# touch 1.txt
[root@hao ~/git_data]# git add 1.txt
[root@hao ~/git_data]# git commit -m "newfile a.txt"
[root@hao ~/git_data]# git status
On branch master
nothing to commit, working tree clean
注意:只要执行一次 commit 操作就相当于做了一个快照。
再举一个提交多个文件的例子:
[root@hao ~/git_data]# touch c.txt
[root@hao ~/git_data]# git add .   # 点. 表示所有,将所有文件提交到暂存区
[root@hao ~/git_data]# git commit -m "newfiel c.txt -->> V1.1"
4. Git 删除和恢复文件
- 删除文件:使用
git rm命令删除文件。 - 恢复文件:如果不小心误删除了工作目录的文件,可以使用
git restore命令恢复。
示例如下:
[root@hao ~/git_data]# git rm 1.txt
[root@hao ~/git_data]# git restore 1.txt
5. Git 修改文件
- 修改文件内容后,需要将修改后的文件添加到暂存区,然后提交到本地仓库。
示例如下
[root@hao ~/git_data]# echo hello > 1.txt
[root@hao ~/git_data]# git add .
[root@hao ~/git_data]# git commit -m "check 1.txt V1.2"
6. 查看历史提交日志
- 使用
git log --oneline命令查看简洁的历史提交日志。
示例如下:
[root@hao ~/git_data]# git log --oneline
200203b (HEAD -> master) check 1.txt V1.2
a6a9b32 newfiel 2.txt V1.1
05b455d newfiel 1.txt V1.0
7. Git 添加内容并比对提交的文件内容
- 使用
echo命令向文件中添加内容,使用git diff命令比对工作目录和暂存区的不同。
示例如下:
[root@hao ~/git_data]# echo 123 >> 1.txt
[root@hao ~/git_data]# git diff 1.txt
diff --git a/1.txt b/1.txt
index ce01362..5923eef 100644
--- a/1.txt
+++ b/1.txt
@@ -1 +1,2 @@
 hello
+123
8. Git 缓存区文件内容对比仓库文件内容
- 使用
git diff --cached命令比对暂存区和本地仓库的不同。
示例如下:
[root@hao ~/git_data]# git add .
[root@hao ~/git_data]# git diff    # 使用 diff 不可以,要 --cached 才可以
[root@hao ~/git_data]# git diff --cached
diff --git a/1.txt b/1.txt
index ce01362..5923eef 100644
--- a/1.txt
+++ b/1.txt
@@ -1 +1,2 @@
 hello
+123
说明:
git diff比对的是工作目录和暂存区的不同。git diff --cached比对的是暂存区和本地仓库的不同。
9. Git 版本回滚
- 使用
git reset --hard命令进行版本回滚,后面跟上要回滚到的提交的哈希值。
示例如下:
[root@hao ~/git_data]# git log --oneline
200203b (HEAD -> master) check 1.txt V1.2
a6a9b32 newfiel 2.txt V1.1
05b455d newfiel 1.txt V1.0
[root@hao ~/git_data]# cat 1.txt
hello
123
[root@hao ~/git_data]# git reset --hard a6a9b32    # 这串哈希值可以用来回滚,相当于恢复快照,用 git log 查看
HEAD is now at a6a9b32 newfiel 2.txt V1.1
[root@hao ~/git_data]# cat 1.txt     # 空,回滚到了之前的内容
10. 查看所有历史提交记录
- 使用
git reflog命令查看所有历史提交记录,包括已经被回滚掉的提交。
示例如下:
[root@hao ~/git_data]# git reflog
a6a9b32 (HEAD -> master) HEAD@{0}: reset: moving to a6a9b32
05b455d HEAD@{1}: reset: moving to 05b455d
200203b HEAD@{2}: commit: check 1.txt V1.2
a6a9b32 (HEAD -> master) HEAD@{3}: commit: newfiel 2.txt V1.1
05b455d HEAD@{4}: commit (initial): newfiel 1.txt V1.0
Git 分支操作
分支含义说明
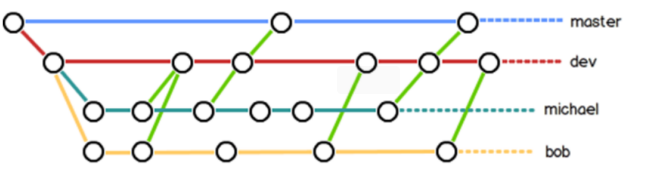
- 分支即是平行空间,假设你在为某个手机系统研发拍照功能,代码已经完成了88%,但如果将这不完整的代码直接提交到git仓库中,又有可能影响到其他人的工作,此时我们便可以在该软件的项目之上创建一个名叫”拍照功能”的分支,这种分支只会属于你自己,而其他人看不到,等代码编写完成后再与原来的项目主分支合并下即可,这样即能保证代码不丢失,又不影响其他人的工作。
- 一般在实际的项目开发中,我们要尽量保证master分支是非常稳定的,仅用于发布新版本,平时不要随便直接修改里面的数据文件,而工作的时候则可以新建不同的工作分支,等到工作完成后在合并到master分支上面,所以团队的合作分支看起来会像上面图那样。
1. 查看分支
使用 git branch 命令可以查看当前仓库中的所有分支。
[root@hao ~/git_data]# git branch2. 创建分支
使用 git branch <branch_name> 命令可以创建一个新的分支,这里以创建 dev 分支为例。
[root@hao ~/git_data]# git branch dev3. 查看当前所在位置
再次使用 git branch 命令,当前所在分支前会带有 * 标记。
[root@hao ~/git_data]# git branch
  dev
* master
4. 切换分支
使用 git checkout <branch_name> 命令可以切换到指定的分支,这里切换到 dev 分支。
[root@hao ~/git_data]# git checkout dev
Switched to branch 'dev'
[root@hao ~/git_data]# git branch
* dev
  master
5. 在分支上开发新功能
在 dev 分支上进行新功能开发,如创建新文件、添加到暂存区并提交。
[root@hao ~/git_data]# touch hao.txt
[root@hao ~/git_data]# git add .
[root@hao ~/git_data]# git commit -m "newfile hao.txt V1.3"
[root@hao ~/git_data]# git status
开发完成后,切换回主分支 master。
[root@hao ~/git_data]# git checkout master6. 合并分支
使用 git merge <source_branch> 命令将指定分支(这里是 dev 分支)的代码合并到当前分支(这里是 master 主分支)。
[root@hao ~/git_data]# git merge dev
Updating 200203b..b33455f
Fast-forward
 hao.txt | 0
 1 file changed, 0 insertions(+), 0 deletions(-)
 create mode 100644 hao.txt
7. 删除分支
合并完成后,如果不再需要该分支,可以使用 git branch -d <branch_name> 命令删除分支,这里删除 dev 分支。
[root@hao ~/git_data]# git branch
  dev
* master
[root@hao ~/git_data]# git branch -d dev
Deleted branch dev (was b33455f).
[root@hao ~/git_data]# git branch
* master
分支冲突
冲突产生原因
先编辑 master 分支并提交到仓库,再编辑 dev 分支并提交到仓库,然后进行分支合并时会报错,这是因为 dev 分支的内容和主分支内容产生了冲突。
操作步骤
1. 编辑 master 分支并提交到仓库
[root@hao ~/git_data]# git branch
  dev
* master
[root@hao ~/git_data]# echo 123abc >> hao.txt
[root@hao ~/git_data]# git add .
[root@hao ~/git_data]# git commit -m "check master hao.txt V1.4"
2. 编辑 dev 分支并提交到仓库
[root@hao ~/git_data]# git checkout dev
Switched to branch 'dev'
[root@hao ~/git_data]# git branch
* dev
  master
[root@hao ~/git_data]# echo 123123erw >> hao.txt
[root@hao ~/git_data]# git add .
[root@hao ~/git_data]# git commit -m "check dev hao.txt V1.4"
[dev 766feea] check dev hao.txt V1.4
 1 file changed, 1 insertion(+)
3. 尝试合并分支(报错)
[root@hao ~/git_data]# git checkout master
[root@hao ~/git_data]# git merge dev   # 合并报错
Auto-merging hao.txt
CONFLICT (content): Merge conflict in hao.txt
Automatic merge failed; fix conflicts and then commit the result.
4. 手动解决合并分支冲突
在主分支更改文件内容,选择取舍冲突内容,然后再提交到仓库。
[root@hao ~/git_data]# git branch
  dev
* master
[root@hao ~/git_data]# cat hao.txt
<<<<<<< HEAD
123abc
=======
123123erw
>>>>>>> dev
[root@hao ~/git_data]# vim hao.txt
[root@hao ~/git_data]# cat hao.txt
123abc
123123erw
[root@hao ~/git_data]# git add .
[root@hao ~/git_data]# git commit -m "check hao.txt V1.4"
Git 标签操作
标签概述
标签也是指向了一次 commit 提交,是一个里程碑式的标签。回滚打标签时直接加标签号,不需要加难以记忆的唯一字符串。标签可视为版本号。
打标签操作
首先查看提交日志,以便确定要打标签的 commit:
[root@hao ~/git_data]# git log --oneline
d922dfc (HEAD -> master) check hao.txt V1.4
766feea (dev) check dev hao.txt V1.4
74e2463 check master hao.txt V1.4
b33455f newfile hao.txt V1.3
200203b check 1.txt V1.2
a6a9b32 newfiel 2.txt V1.1
05b455d newfiel 1.txt V1.0
为指定的 commit 打标签,这里为 05b455d 打 V1.0 标签,为 d922dfc 打 V1.4 标签,并添加相应的描述信息:
[root@hao ~/git_data]# git tag -a V1.0 05b455d -m "V1.0稳定版本"
[root@hao ~/git_data]# git tag -a V1.4 d922dfc -m "V1.4最新支持版本"
查看已有的标签:
[root@hao ~/git_data]# git tag
V1.0
V1.4
查看标签详细信息
使用 git show 命令查看指定标签的详细信息,这里查看 V1.0 标签的信息:
[root@hao ~/git_data]# git show V1.0
tag V1.0
Tagger: haoshuaicong <haoshuaicong@mail.com>
Date:   Mon Feb 17 21:52:35 2025 +0800

V1.0稳定版本

commit 05b455dba06fb4cc50e2c60f4d32a40e6b13a132 (tag: V1.0)
Author: haoshuaicong <haoshuaicong@mail.com>
Date:   Mon Feb 17 20:50:03 2025 +0800

    newfiel 1.txt V1.0

diff --git a/1.txt b/1.txt
new file mode 100644
index 0000000..e69de29
通过标签版本回滚代码
使用 git reset --hard 命令结合标签名进行代码回滚,先回滚到 V1.0 版本,再回滚到 V1.4 版本,并查看对应版本下的文件:
[root@hao ~/git_data]# git reset --hard V1.0
[root@hao ~/git_data]# ls
1.txt
[root@hao ~/git_data]# git reset --hard V1.4
[root@hao ~/git_data]# ls
1.txt  2.txt  hao.txt
删除标签
使用 git tag -d 命令删除指定的标签,这里删除 V1.0 标签,然后查看剩余的标签:
[root@hao ~/git_data]# git tag -d V1.0
Deleted tag 'V1.0' (was 4578f6e)
[root@hao ~/git_data]# git tag
V1.4
gitLab
ubt安装gitlab
1. 更换阿里云仓库
首先需要将系统的软件源更换为阿里云仓库,这样可以加快软件下载速度。不过文档中未给出具体更换步骤,一般操作如下(以 Ubuntu 20.04 为例):
# 备份原有的源列表文件
sudo cp /etc/apt/sources.list /etc/apt/sources.list.bak
# 编辑源列表文件
sudo vim /etc/apt/sources.list
将文件内容替换为阿里云的源:
deb http://mirrors.aliyun.com/ubuntu/ focal main restricted universe multiverse
deb-src http://mirrors.aliyun.com/ubuntu/ focal main restricted universe multiverse

deb http://mirrors.aliyun.com/ubuntu/ focal-security main restricted universe multiverse
deb-src http://mirrors.aliyun.com/ubuntu/ focal-security main restricted universe multiverse

deb http://mirrors.aliyun.com/ubuntu/ focal-updates main restricted universe multiverse
deb-src http://mirrors.aliyun.com/ubuntu/ focal-updates main restricted universe multiverse

deb http://mirrors.aliyun.com/ubuntu/ focal-proposed main restricted universe multiverse
deb-src http://mirrors.aliyun.com/ubuntu/ focal-proposed main restricted universe multiverse

deb http://mirrors.aliyun.com/ubuntu/ focal-backports main restricted universe multiverse
deb-src http://mirrors.aliyun.com/ubuntu/ focal-backports main restricted universe multiverse
保存并退出编辑器,然后更新软件包列表:
sudo apt-get update2. 安装依赖
使用以下命令安装 GitLab 所需的依赖软件包:
apt-get install -y curl openssh-server ca-certificates tzdata perl3. 用包安装 GitLab
使用 dpkg 命令安装下载好的 GitLab 社区版(CE)的 .deb 包,这里假设包名为 gitlab-ce_16.5.2-ce.0_amd64.deb:
[root@hao ~/git_data]# dpkg -i gitlab-ce_16.5.2-ce.0_amd64.deb4. 更改配置文件为自己的 URL
编辑 GitLab 的配置文件 /etc/gitlab/gitlab.rb,将 external_url 修改为自己服务器的 IP 地址或域名,这里假设服务器 IP 为 10.0.0.201:
[root@hao ~/git_data]# vim /etc/gitlab/gitlab.rb
external_url 'http://10.0.0.201'
5. 重新配置并启动 GitLab
使用以下命令重新配置 GitLab 并启动服务:
sudo gitlab-ctl reconfigure6. 管理服务
可以使用以下命令对 GitLab 服务进行管理:
root@ubuntu:~# gitlab-ctl status # 查看 GitLab 状态
root@ubuntu:~# gitlab-ctl stop # 停止 GitLab 服务
root@ubuntu:~# gitlab-ctl start # 启动 GitLab 服务
页面设置gitlab
7. 访问 GitLab
安装完成后,可以通过浏览器访问配置的 external_url,这里是 10.0.0.200。
- 默认用户:
root - 临时密码:可以通过以下命令查看初始的
root用户密码:
cat /etc/gitlab/initial_root_password需要注意的是,这个初始密码文件会在首次使用后或者在安装后的 24 小时后自动删除。
8.修改为中文

9.修改密码

10.停用自动注册,不让别人注册


创建项目,推送拉取代码
11.创建一个组


12.创建新项目–第一种方式
- 第一种方式: 空的代码仓库,在gitlab创建代码仓库,然后拉取到本地服务器


两种方式访问代码

13.打通ssh免密
1.生成密钥
[root@hao ~]# ssh-keygen
2.将公钥复制到gitlab的root账号下
[root@hao ~]# cat .ssh/id_rsa.pub


14.将空仓库下载到本地,修改项目并推送到远程仓库
1. 使用 git clone 下载空仓库到本地
使用 git clone 命令将远程仓库克隆到本地,这里以 git@10.0.0.201:hsc/game.git 仓库为例:
[root@hao ~]# git clone git@10.0.0.201:hsc/game.git2. 配置使用人信息
进入克隆下来的仓库目录,配置全局的用户名、邮箱,并设置是否开启颜色显示,最后查看配置信息:
[root@hao ~]# cd game/
[root@hao ~/game]# git config --global user.name  "haoshuaicong"
[root@hao ~/game]# git config --global user.email  "haoshuaicong@mail.com"
[root@hao ~/game]#  git config --global color.ui  true
[root@hao ~/game]# git config --list
user.name=haoshuaicong
user.email=haoshuaicong@mail.com
color.ui=true
core.repositoryformatversion=0
core.filemode=true
core.bare=false
core.logallrefupdates=true
remote.origin.url=git@10.0.0.201:hsc/game.git
remote.origin.fetch=+refs/heads/*:refs/remotes/origin/*
branch.main.remote=origin
branch.main.merge=refs/heads/main
3. 创建新文件并提交到本地仓库
在本地仓库中创建新文件 game.txt,将其添加到暂存区并提交到本地仓库。不过原内容中 gita dd. 存在拼写错误,正确的应该是 git add .:
root@ubuntu:~/game# touch game.txt
root@ubuntu:~/game# git add .
root@ubuntu:~/game# git commit -m "nwfilefile game.txt"
4. 查看远程仓库信息
查看远程仓库的名称和详细地址:
root@ubuntu:~/game# git remote
origin
[root@hao ~/game]# git remote -v
origin    git@10.0.0.201:hsc/game.git (fetch)
origin    git@10.0.0.201:hsc/game.git (push)
5. 将本地仓库的代码提交到远程仓库
使用 git push -u 命令将本地仓库的代码推送到远程仓库的 main 分支:
root@ubuntu:~/game# git push -u origin main6.页面查看项目,有没有新文件

15.第二种方式–第二种方式
- 手动配置远程仓库并推送
- 第二种方式: 已经存在的代码仓库,需要配置远程仓库,然后将本地仓库中的代码推送到远程服务器
0.创建项目和文件
[root@hao ~]# mkdir git_data && cd git_data
[root@hao ~/git_data]# git init
[root@hao ~/git_data]# touch {1..3}.txt
[root@hao ~/git_data]# git add .
[root@hao ~/git_data]# git commit -m "newfile {1..3}.txt"

1. 查看默认远程仓库
在当前工作目录下查看默认的远程仓库,发现没有配置任何远程仓库。
root@ubuntu:~/git_data# git remote
root@ubuntu:~/git_data# git remote -v
2. 配置远程仓库
将远程仓库配置到本地,指定远程仓库名称为 origin,并使用克隆地址 git@10.0.0.201:hsc/test.git 进行配置。配置完成后查看远程仓库的详细信息。
[root@hao ~/git_data]# git remote add origin git@10.0.0.201:hsc/test.git
[root@hao ~/git_data]# git remote -v
origin    git@10.0.0.201:hsc/test.git (fetch)
origin    git@10.0.0.201:hsc/test.git (push)
3. 查看本地主分支名字并推送到远程仓库
查看本地当前分支情况,确认主分支名称为 master,然后使用 git push -u 命令将本地的 master 分支推送到远程仓库的 master 分支,推送完成后可刷新网页查看远程仓库的更新情况。
[root@hao ~/git_data]# git branch
* master
[root@hao ~/git_data]# git push -u origin master
16. 推送 game 代码到 game 项目
先删除原有所有文件:
[root@hao ~/game]# git rm -f README.md
[root@hao ~/game]# git rm -f game.txt
[root@hao ~/game]# git add .
[root@hao ~/game]# git commit -m "del game.txt README.md"
上传 game 代码,并推送:
[root@hao ~/game]# ls
bgm.mp3  css  images  index.html  js  roms  shuoming.html
[root@hao ~/game]# git add .
[root@hao ~/game]# git commit -m "xbw code v1.0"
[root@hao ~/game]# git branch   #查看分支名称
* main
[root@hao ~/game]# git remote    #查看远程仓库名称
origin
[root@hao ~/game]# git push -u origin main  #推送到远程仓库
创建普通用户(开发),并上传代码
创建用户


给dev用户分配组

dev 所需设置
dev 开发使用的服务器 10.0.0.31
1.开发需要在自己的 Linux 系统中生成秘钥对
[root@dev:~]# ssh-keygen查看生的公钥:
[root@nfs01 ~]# cat .ssh/id_rsa.pub2.将公钥复制到 GitLab 的 dev 账号中

dev 操作项目
1. 拉取项目
开发时使用 clone 命令拉取项目到本地:
[root@nfs01 ~]# git clone git@10.0.0.201:hsc/game.git
[root@nfs01 ~]# ll
drwxr-xr-x 7 root root 119 Feb 18 19:59 game
2. 配置使用人信息
进入项目目录,配置全局的用户邮箱和用户名,并查看配置列表:
[root@nfs01 ~/game]# git config --global user.email "dev@123.com"
[root@nfs01 ~/game]# git config --global user.name "dev"
[root@nfs01 ~/game]# git config --list
3. 开发写代码
对项目中的 index.html 文件进行编辑,将修改添加到暂存区并提交到本地仓库:
[root@nfs01 ~/game]# vim index.html
[root@nfs01 ~/game]# git add .
[root@nfs01 ~/game]# git commit -m "魂斗罗aaaa"
4. 提交到远程仓库
默认不直接提交到 master 主分支,而是先创建子分支 dev,然后将子分支推送到远程仓库:
[root@nfs01 ~/game]# git branch dev
[root@nfs01 ~/game]# git push -u origin dev
5.发起合并到主分支请求


6.切换到root账号审核请求
