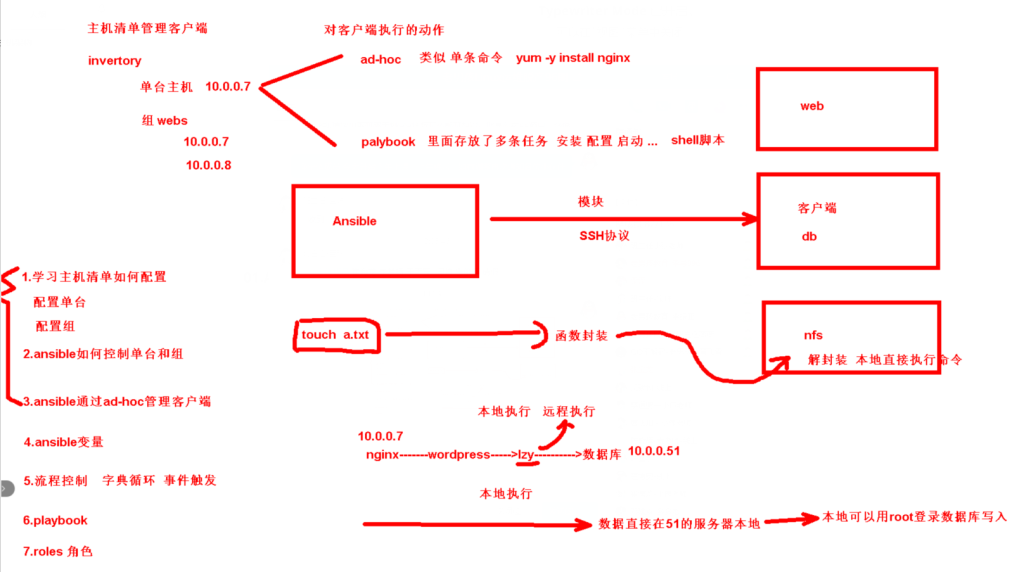
Ansible架构图

- Ansible是吧函数压缩包扔过去,然后在本机解压执行命令,本地执行
安装配置Ansible
1.准备一台麒麟系统服务器61
umount /tmp
yum install -y python3-pip
pip3 install ansible

#如果是centos7直接yum安装


2.配置ansible
[root@ansible ~]# cat /etc/ansible/ansible.cfg
[defaults]
host_key_checking = False
deprecation_warnings = False
interpreter_python = /usr/bin/python3
[inventory]
[privilege_escalation]
[paramiko_connection]
[ssh_connection]
[persistent_connection]
[accelerate]
[selinux]
[colors]
[diff]

[root@ansible ~]# cat /etc/ansible/hosts
10.0.0.31
Ansible主机清单
1.主机清单默认配置文件
基于用户密码方式连接
1.使用用户密码和密码
- 定义ip+用户+端口+密码
[root@ansible ~]# cat /etc/ansible/hosts
10.0.0.31 ansible_ssh_user=root ansible_ssh_port=22 ansible_ssh_pass='haoshuaicong123.com'
2.使用别名方式
[root@ansible ~]# cat /etc/ansible/hosts
10.0.0.31 ansible_ssh_user=root ansible_ssh_port=22 ansible_ssh_pass='haoshuaicong123.com'
10.0.0.41 ansible_ssh_user=root ansible_ssh_port=22 ansible_ssh_pass='haoshuaicong123.com'

nfs  ansible_ssh_host=10.0.0.31  ansible_ssh_user=root ansible_ssh_port=22 ansible_ssh_pass='haoshuaicong123.com'
测试连接
- 绿色就是成功
[root@ansible ~]# ansible 10.0.0.31 -m ping
[root@ansible ~]# ansible nfs -m ping

10.0.0.31 | SUCCESS => {
    "changed": false,
    "ping": "pong"
}


#如果报you must install the sshpass program则需要安装sshpass
基于秘钥方式控制客户端
1.生成秘钥对
ssh-keygen
一路回车
2.发送到客户端
ssh-copy-id 10.0.0.31
ssh-copy-id 10.0.0.41
3.测试ssh免密
ssh 10.0.0.41
ssh 10.0.0.31
2.定义主机清单invertory
- 免密钥,不需要定义用户密码,默认22,默认root
- 使用别名和免密钥
[root@ansible ~]# cat /etc/ansible/hosts

nfs ansible_ssh_host=10.0.0.31
backup ansible_ssh_host=10.0.0.41
执行ansible ping测试
ansible nfs -m ping
ansible all -m ping
3.主机清单定义组
- 使用组
[root@ansible ~]# cat /etc/ansible/hosts
nfs ansible_ssh_host=10.0.0.31
backup ansible_ssh_host=10.0.0.41
[back]
nfs
backup

[webservers]
web01 ansible_ssh_host=10.0.0.7
web02 ansible_ssh_host=10.0.0.8
4.配置子组
- 使用children
- 合并组,子组
[root@ansible ~]# cat /etc/ansible/hosts
nfs ansible_ssh_host=10.0.0.31
backup ansible_ssh_host=10.0.0.41

[back]
backup

[bac]
nfs

[lnmp:children]
back
bac
5.主机清单小结
- 默认的主机清单:
/etc/ansible/hosts - 指定主机清单:
ansible all -m ping -i hosts - 配置方式:
- 单台配置基于用户名和密码:
10.0.0.31 ansible_ssh_user=root ansible_ssh_port=22 ansible_ssh_pass='haoshuaicong123.com' - 别名的配置:
nfs ansible_ssh_host=10.0.0.31 - 基于秘钥方式远程管理(常用):创建组
[webservers] 10.0.0.7 10.0.0.8
Ansible 模块使用总结
- -i:指定主机清单文件,告诉Ansible哪些机器需要被管理。
- ansible -i /root/hosts
- -m:指定要执行的模块,比如
ping模块用于测试连接,copy模块用于文件传输。 - ansible -m ping
- ansible -m copy
- -a:传递参数给模块,告诉模块具体要执行什么操作。
- ansible -m command -a ‘ls -l’
Ansible执行命令都是以模块的方式执行。基本语法如下:
ansible 主机名称 -m 指定模块的名称 -a 具体执行的命令动作例如:
ansible nfs -m command -a 'df -h'查看模块使用方法:
ansible-doc copy
#进出后过滤EXAMPLES

ansible-doc -l | grep copy
#查看支持的模块
模块1: yum
name: 软件包的名称,如wgetstate: 执行的动作,present表示安装,absent表示卸载
# 安装wget命令
ansible backup -m yum -a 'name=wget state=present'

# 卸载wget命令
ansible backup -m yum -a 'name=wget state=absent'

# 安装rpm包
mount /dev/cdrom  /mnt  #挂载系统镜像,系统镜像里有rpm包
ls /mnt/Packages/ | grep wget
ansible backup -m yum -a 'name=wget-1.20.3-3.ky10.x86_64.rpm state=present'

# 安装rsync服务
ansible backup -m yum -a 'name=rsync state=present'
模块2: copy
src: 源文件(Ansible服务器上的位置)dest: 拷贝到目标主机的哪个位置owner: 属主,如wwwgroup: 属组,如wwwmode: 权限,如600backup: 是否给当前的文件做一个以时间命名的备份文件backup=yes- content:追加重定向内容content=”backup:123456″
# 将本地文件a.txt拷贝到远程主机的/root/目录下
ansible lnmp -m copy -a 'src=a.txt dest=/root/ owner=www group=www mode=600'

# 将字符串直接写入到目标文件中
ansible lnmp -m copy -a 'content="backup:123456" dest=/root/pass.txt mode=0600'

# 将rsyncd.conf拷贝到/etc/目录下
ansible backup -m copy -a 'src=rsyncd.conf dest=/etc/'

# 将rsyncd.conf拷贝到/etc/目录下,并把原来的配置文件备份
ansible backup -m copy -a 'src=rsyncd.conf dest=/etc/ backup=yes'
模块3: user
uid: 指定uidgroup: 指定组名称shell: 指定解释器,如/bin/bash或/sbin/nologincreate_home: 是否创建家目录,默认为truestate:present创建用户,absent删除用户remove: yes删除用户时是否同时删除家目录
# 在backup上创建haoshuaicong用户
ansible backup -m user -a 'name=haoshuaicong state=present'

# 创建用户old,uid=777,gid=777,不创建家目录,不允许登录
ansible backup -m user -a 'name=old uid=777 group=old shell=/sbin/nologin create_home=false state=present'
模块4: group
name: 组名称gid: 组的gid号state:present创建组
# 创建组old,gid=777
ansible backup -m group -a 'name=old gid=777 state=present'
模块5: file
path: 文件的路径state:touch创建文件,directory创建目录,absent删除文件或目录owner: 属主group: 属组mode: 权限recurse: yes是否递归修改属主属组
# 创建普通文件a.txt
ansible backup -m file -a 'path=/root/a.txt state=touch'

# 修改文件的属主属组
ansible backup -m file -a 'path=/root/a.txt owner=www group=www mode=0600'

# 创建目录haoshuaicong
ansible backup -m file -a 'path=/root/haoshuaicong state=directory'

# 递归修改目录下属主属组
ansible backup -m file -a 'path=/root/haoshuaicong owner=www group=www recurse=yes'

# 删除文件a.txt
ansible backup -m file -a 'path=/root/a.txt state=absent'

# 删除目录,默认是递归删除
ansible backup -m file -a 'path=/root/haoshuaicong state=absent'

# 创建rsync的备份目录
ansible backup -m file -a 'path=/backup state=directory owner=www group=www'

# 创建密码文件
ansible backup -m copy -a 'content=rsync_backup:123456 dest=/etc/rsync.passwd mode=0600'
模块6: systemd
# 启动并启用rsyncd服务
ansible backup -m systemd -a 'name=rsyncd state=started enabled=yes'
ansible backup -m systemd -a 'name=rsyncd state=reloaded'


# tomcat配置完system必须daemon-reload一个作用
ansible backup -m systemd -a 'name=rsync daemon_reload=yes'
模块7: shell 模块
shell模块允许在远程主机上执行shell命令,它比command模块更灵活,因为它可以执行复杂的shell脚本和命令。
shell模块支持管道,command简单的,shell支持的多
示例:
# 在远程主机上执行 shell 命令
ansible all -m shell -a 'echo $HOME'
模块8: ping 模块
ping模块用于测试Ansible与远程主机之间的连接是否正常,通常用于确保主机清单中的主机是可达的。
示例:
# 测试与远程主机的连接
ansible all -m ping
模块9: command 模块
command模块用于在远程主机上执行命令。与shell模块相比,command模块更简单,它不解释shell的特性,比如通配符、管道等。
示例:
# 在远程主机上执行命令
ansible all -m command -a 'ls -l /'
yum_repository 模块
用于管理YUM仓库。可以添加或删除仓库。
示例:
# 添加一个YUM仓库,就是把yum仓库内容加到-a里面
ansible backup -m yum_repository -a 'name=epel description="cnetos7 epel" baseurl=http://mirrors.aliyun.com/epel/7/$basearch enabled=1 gpgcheck=0'

# 删除一个YUM仓库
ansible all -m yum_repository -a 'name=my_repo state=absent'
mount 模块
用于管理文件系统的挂载。
示例:
# 挂载一个文件系统
ansible all -m mount -a 'path=/mnt/mydrive src=/dev/sdb1 fstype=ext4 opts=defaults state=mounted'

# 卸载一个文件系统
ansible all -m mount -a 'path=/mnt/mydrive state=unmounted'
cron 模块
用于管理cron任务。
示例:
# 添加一个cron任务
ansible backup -m cron -a 'name=touch minute='*' job="touch /root/123.txt"'
ansible backup -m cron -a 'name=touch hour='*/2' job="touch /root/123.txt"'
#五颗星用字段规定,分时日月周
minute
hour
day
month
weekday


# 删除一个cron任务
ansible all -m cron -a 'name="Backup" state=absent'
firewalld 模块
用于管理firewalld服务的防火墙规则。
示例:
# 开放端口
ansible all -m firewalld -a 'service=http permanent=true state=enabled'

# 关闭端口
ansible all -m firewalld -a 'service=http permanent=true state=disabled'
selinux 模块
用于管理SELinux的状态。
示例:
# 禁用SELinux
ansible all -m selinux -a 'state=disabled'

# 启用SELinux
ansible all -m selinux -a 'state=enforcing'
unarchive 模块
用于解压文件。
示例:
# 解压一个tar.gz文件
ansible all -m unarchive -a 'src=/path/to/archive.tar.gz dest=/path/to/extract'

# 解压一个zip文件
ansible all -m unarchive -a 'src=/path/to/archive.zip dest=/path/to/extract'
get_url 模块
用于从URL下载文件。
示例:
# 下载一个文件
ansible all -m get_url -a 'url=http://example.com/file.zip dest=/path/to/download'