Nginx性能优化
- qps(每秒查询率)
- 理论单台nginx最高支持五万并发
一、压力测试笔记
1、安装压力测试工具
在root@lb01环境下,使用yum命令安装httpd-tools:
[root@lb01 ~]# yum -y install httpd-tools2、使用压力测试命令ab
在root@web01环境下执行压力测试命令ab。
(一)基本命令格式
ab -n <请求数> -c <并发数> <测试网址>其中:
-n:指定要执行的请求数。-c:指定请求的并发数。-k:是否开启长连接(本次未使用该参数示例)。
(二)示例命令及结果
- 示例命令
[root@web01 ~]# ab -n20000 -c200 http://127.0.0.1/index.html- 结果分析
- 测试信息
[root@web01 ~]# ab -n20000 -c200 http://127.0.0.1/index.html

This is ApacheBench, Version 2.3 <$Revision: 1874286 $>    # 显示压力测试工具 ApacheBench 的版本信息
Copyright 1996 Adam Twiss, Zeus Technology Ltd, http://www.zeustech.net/    # 说明工具的版权所属方及相关版权信息链接
Licensed to The Apache Software Foundation, http://www.apache.org/    # 表明工具的授权对象及授权相关链接
Benchmarking 127.00.1 (be patient)    # 提示正在对 127.0.0.1 进行压力测试并需耐心等待
Completed 2000 requests    # 表示已完成 2000 个请求
Completed 4000 requests
Completed 6000 requests
Completed 8000 requests
Completed 10000 requests
Completed 12000 requests
Completed 14000 requests
Completed 16000 requests
Completed 18000 requests
Completed 20000 requests    # 表示已完成 20000 个请求
Finished 20000 requests    # 表明 20000 个请求全部完成
Server Software: nginx/1.26.1     # 被测试服务器运行的 Nginx 软件版本号
Server Hostname: 127.0.0.1    # 压力测试的目标主机名称
Server Port: 80    # 被测试网站所使用的端口号
Document Path: /index.html    # 压力测试针对的具体资源路径
Document Length: 9 bytes    # 被测试页面的总字节长度
Concurrency Level: 200    # 压力测试设定的并发数量
Time taken for tests: 1.498 seconds    # 整个压力测试过程所花费的时间
Complete requests: 20000    # 成功完成的请求总数
Failed requests: 0    # 测试过程中失败的请求数量
Total transferred: 5140000 bytes    # 测试中传输的总数据量,包含页面及头部信息
HTML transferred: 180000 bytes    # 单纯页面 HTML 内容的传输量
Requests per second: 13352.94 [#/sec] (mean)    # 平均每秒处理的请求数量,即吞吐量
Time per request: 14.978 [ms] (mean)    # 每个请求从发出到完成的平均等待时间
Time per request: 0.075 [ms] (mean, across all concurrent requests)    # 每个并发请求的平均处理时间
Transfer rate: 3351.28 [Kbytes/sec] received    # 接收数据的传输速率
Connection Times (ms)
min mean [+/-sd] median max
Connect: 0 7 25.0 3 1050    # Connect 相关数据,包括最小连接时间、平均连接时间、标准差、中位数连接时间、最大连接时间
Processing: 0 6 13.6 4 216    # Processing 相关数据,处理请求数据的时间信息
Waiting: 0 5 12.6 3 215    # Waiting 相关数据,等待服务器响应的时间信息
Total: 0 14 28.8 8 1061    # Total 相关数据,从连接建立到请求处理完成的总时间信息
Percentage of the requests served within a certain time (ms)
50% 8 # 表示 50% 的请求在 8 毫秒内完成
66% 11 # 表示 66% 的请求在 11 毫秒内完成
75% 12
80% 14
90% 19
95% 37
98% 108
99% 119 # 表示 99% 的请求在 119 毫秒内完成
100% 1061 (longest request) # 表示所有请求在 1061 毫秒内完成,其中最长请求耗时 1061 毫秒
(三)查看有多少端口没被释放
命令:
netstat -an  |  grep 80 | grep TIME_WAIT | wc -l


-a选项表示显示所有(包括监听和非监听)套接字连接,等待接收网络请求。
-n选项表示以数字形式(如 IP 地址和端口号)显示地址和端口,而不是尝试将其解析为主机名和
ulimit -n
主要用于查看或设置进程可以打开的文件描述符(file descriptor)的数量限制。
65535
1024lsof
list open files是一个在 Unix 和类 Unix 系统(如 Linux、macOS 等)中非常有用的命令行工具。它用于列出当前系统中被进程打开的文件信息。post提交上传请求:考验服务器
二、文件句柄优化
进程打开文件最大数量,下面为系统全局修改

[root@web01 ~]# tail -1 /etc/security/limits.conf
* - nofile 65535
三、内核参数修改
调整内核参数:让time_wait状态重用(端口重用)[flag]
开启端口服用

[root@web01 ROOT]# vim /etc/sysctl.conf
net.ipv4.tcp_tw_reuse = 1   # 开启端口复用
net.ipv4.tcp_timestamps = 0   # 禁用时间戳

[root@web01 ROOT]# sysctl -p   #可以查看我们添加的内核参数
[root@web01 ROOT]# sysctl -a   #可以查看所有内核参数

端口复用引发的故障
https://www.cnblogs.com/larry-luo/p/15649168.html
四、代理服务使用长连接
开启16秒长链接,tcp不断开,keepalive 16;


[root@lb01 conf.d]# vim wp.conf
upstream wp {
     server 172.16.1.7:80;
     server 172.16.1.8:80;
     keepalive 16;
}
location /http/ {
proxy_pass http://http_backend;
proxy_http_version 1.1; #对于http协议应该指定为1.1
proxy_set_header Connection ""; #清除“connection”头字段
proxy_next_upstream error timeout http_500 http_502 http_503 http_504; #平滑过渡
proxy_set_header Host $http_host;
proxy_set_header X-Real-IP $remote_addr;
proxy_set_header X-Forwared-For $proxy_add_x_forwarded_for;
proxy_connect_timeout 30s; # 代理连接web超时时间
proxy_read_timeout 60s; # 代理等待web响应超时时间
proxy_send_timeout 60s; # web回传数据至代理超时时间
proxy_buffering on; # 开启代理缓冲区,web回传数据至缓冲区,代理边收边传返回给客户端
-----------------------下方详解
location /http/ {
# 将请求反向代理到名为 http_backend 的后端服务器集群
proxy_pass http://http_backend;
# 指定使用 HTTP/1.1 协议进行代理通信,以充分利用其特性,如长连接等
proxy_http_version 1.1;
# 清除“Connection”头字段,避免因头字段传递导致的连接行为不一致等问题
proxy_set_header Connection "";
# 当后端服务器出现错误、超时或返回特定 HTTP 错误码(500、502、503、504)时,
# 自动切换到下一个可用的后端服务器进行请求处理,实现平滑过渡,提高服务的可用性
proxy_next_upstream error timeout http_500 http_502 http_503 http_504;
# 将客户端请求中的 Host 头字段原封不动地传递给后端服务器,以便后端服务器能够正确识别请求的主机名
proxy_set_header Host $http_host;
# 将客户端的真实 IP 地址设置到 X-Real-IP 头字段中,传递给后端服务器,使后端服务器能够获取到真实的客户端来源 IP
proxy_set_header X-Real-IP $remote_addr;
# 将客户端的 IP 地址以及经过代理服务器添加的其他转发 IP 信息组合设置到 X-Forwarded-For 头字段中,
# 用于记录请求经过的代理链信息,方便后端服务器进行日志记录和分析等操作
proxy_set_header X-Forwared-For $proxy_add_x_forwarded_for;
# 设置代理连接到后端服务器的超时时间为 30 秒,如果在这个时间内未能成功连接到后端服务器,
# 则此次代理请求视为失败,并根据相关配置进行处理,如返回错误信息给客户端或切换到下一个后端服务器
proxy_connect_timeout 30s;
# 设置代理等待后端服务器响应的超时时间为 60 秒,如果在这个时间内后端服务器没有返回响应数据,
# 则此次代理请求视为失败,并根据相关配置进行处理
proxy_read_timeout 60s;
# 设置后端服务器回传数据至代理服务器的超时时间为 60 秒,如果在这个时间内数据未能完整传输到代理服务器,
# 则此次代理请求视为失败,并根据相关配置进行处理
proxy_send_timeout 60s;
# 开启代理缓冲区功能,当后端服务器回传数据时,数据先进入代理服务器的缓冲区,
# 代理服务器可以一边接收数据一边将已接收的数据传输给客户端,这样可以提高数据传输的效率和稳定性,
# 特别是在处理大文件或网络不稳定的情况下,能够更好地控制数据流量和传输过程
proxy_buffering on;
}五、配置静态页面缓存
缓存七天jpg|gif|png缓存七天 expires  7d;

[root@web01 conf.d]# cat test.conf
server {
        listen 80;
        server_name test.haoshuaicong.com;
                root /code;
        location / {
                index index.html;
        }
        location ~ .*\.(jpg|gif|png)$ {
        expires      7d;
        }
}

访问一张图片测试
新配置的页面不希望被用户缓存,经常变化,希望用户每次请求都到源站
        location ~ .*\.(js|css|html)$ {
          add_header Cache-Control no-store;
          add_header Pragma no-cache;
      }
六、文件高效传输
- 小文件多,开启tcp_nodelay
- 大文件多,开启tcp_nopush
sendfile 参数


vim nginx.conf
...
sendfile        on;
tcp_nopush     on;        # 大文件开启此配置
tcp_nodelay on;            # 小文件开启此位置
...
七、文件gzip压缩
gzip on;  # 开启 gzip 压缩功能,对符合条件的响应数据进行压缩以减少传输量
gzip_http_version 1.1;  # 仅针对 HTTP/1.1 及以上版本协议启用 gzip 压缩
gzip_comp_level 5;  # 设置 gzip 压缩级别为 5,在压缩比和压缩速度间取得平衡
gzip_types text/plain application/json application/x-javascript application/css application/xml text/javascript;  # 指定对这些 MIME 类型的文件进行 gzip 压缩,如纯文本、JSON 数据、JavaScript 脚本、CSS 样式、XML 文件等

proxy_connect_timeout 30s;  # 代理连接 web 超时时间,规定代理服务器与后端 web 服务器建立连接的最长等待时间为 30 秒,若超过该时间则连接视为失败,可防止代理长时间等待连接建立而阻塞请求处理


[root@web01 conf.d]# cat test.conf

    location ~ .*\.(txt|xml|html|json|js|css)$ {
        gzip on;
        gzip_http_version 1.1;
        gzip_comp_lev


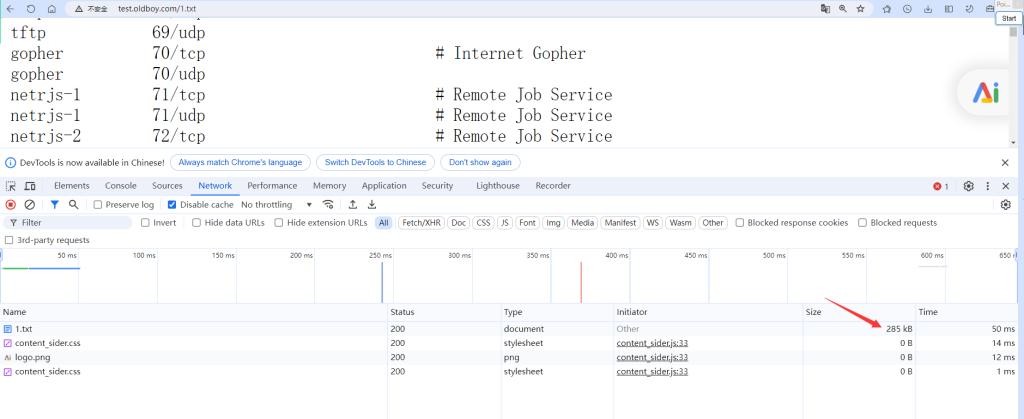
[root@web01 conf.d]# cat /etc/services /etc/services > /code/1.txt
[root@web01 conf.d]# ll -h /code/1.txt
-rw-r--r-- 1 root root 1.4M Dec 19 11:16 /code/1.txt

压缩后访问文档测试
test.haoshuaicong.com/1.txt
八、防盗链
- 防止被其他网站盗用,扛资源流量
- 以下测试
1.准备盗链的服务器 WEB01
[root@web01 conf.d]# cat test.conf
server {
        listen 80;
        server_name test.haoshuaicong.com;
                root /code;
        location / {
                index index.html;
        }

    location ~ .*\.(jpg|png|gif) {
        gzip on;
        gzip_types image/jpeg image/gif image/png;
        gzip_comp_level 9;
        gzip_http_version 1.1;
    }
}
[root@web01 conf.d]# cat /code/index.html
<html>
    <head>
            <meta charset="utf-8">
                <title>haoshuaicong.com</title>
    </head>
    <body style="background-color:pink;">
            <center><img src="http://web.haoshuaicong.com/daolian.jpg"/></center>
    </body>
</html>


2.准备源站WEB02
[root@web02 conf.d]# cat d.conf
server {
        listen 80;
        server_name web.haoshuaicong.com;
                root /code;
        location / {
                index index.html;
        }
}

[root@web02 conf.d]# nginx -t
nginx: the configuration file /etc/nginx/nginx.conf syntax is ok
nginx: configuration file /etc/nginx/nginx.conf test is successful
[root@web02 conf.d]# systemctl restart nginx

上传一张图片到/code
[root@web02 code]# ll daolian.jpg
-rw-r--r-- 1 root root 438692 Dec 19 11:33 daolian.jpg

windows hosts解析
10.0.0.7  test.haoshuaicong.com
10.0.0.8  web.haoshuaicong.com

3.访问网站
访问daolian网站,显示的是源站的资源,消耗源站的资源带宽
以下为防盗配置:
location ~.*\.(jpg|png|gif) {
    valid_referers none blocked *.baidu.com;  # 设置合法的引用来源(referer),这里表示允许的引用来源情况,"none"表示允许没有referer的请求(比如直接在浏览器地址栏输入网址访问的情况),"blocked"表示referer被浏览器设为隐私保护模式而被隐藏的情况,"*.baidu.com"表示来自百度域名下的任意子域名的referer都是合法的。
    if ( $invalid_referer ) {  # 通过内置的变量$invalid_referer来判断当前请求的referer是否不符合上面定义的合法引用来源情况,如果不符合(即$invalid_referer变量值为真),则执行下面的操作。
        return 403;  # 当请求的referer不符合合法要求时,直接向客户端返回403状态码,表示禁止访问,客户端接收到这个状态码后会知道该请求被服务器拒绝了。
    }
}


4.在web02上配置防止盗链
[root@web02 conf.d]# cat d.conf
server {
        listen 80;
        server_name web.haoshuaicong.com;
                root /code;
        location / {
                index index.html;
        }
        location ~ .*\.(jpg|png|gif) {
         valid_referers none blocked *.baidu.com;
         if ( $invalid_referer ) {
            return 403;
        }
}

# 指定返回页面或者图片 或者html页面d.png
[root@web02 conf.d]# cat d.conf
server {
        listen 80;
        server_name web.haoshuaicong.com;
                root /code;
        location / {
                index index.html;
        }
        location ~ .*\.(jpg|png|gif) {
         valid_referers none blocked *.baidu.com;
         if ( $invalid_referer ) {
            #return 403;
        rewrite ^(.*)$ /d.png break;       # 在/code/下准备d.png的图片
        }
}
九、跨域请求
1.配置跨域文件
[root@web02 conf.d]# cat s.conf
server {
        listen 80;
        server_name s.haoshuaicong.com;
        location / {
                root /code;
                index index.html;
        }
}

[root@web02 conf.d]# cat /code/index.html
<html lang="en">
<head>
        <meta charset="UTF-8" />
        <title>测试ajax和跨域访问</title>
        <script src="http://libs.baidu.com/jquery/2.1.4/jquery.min.js"></script>
</head>
<script type="text/javascript">
$(document).ready(function(){
        $.ajax({
        type: "GET",
        url: "http://test.haoshuaicong.com",
        success: function(data) {
                alert("sucess 成功了!!!");
        },
        error: function() {
                alert("fail!!,跨不过去啊,不让进去啊,只能...!");
        }
        });
});
</script>
        <body>
                <h1>跨域访问测试</h1>
        </body>
</html>

windows 解析
10.0.0.8  s.haoshuaicong.com
10.0.0.7  test.haoshuaicong.com
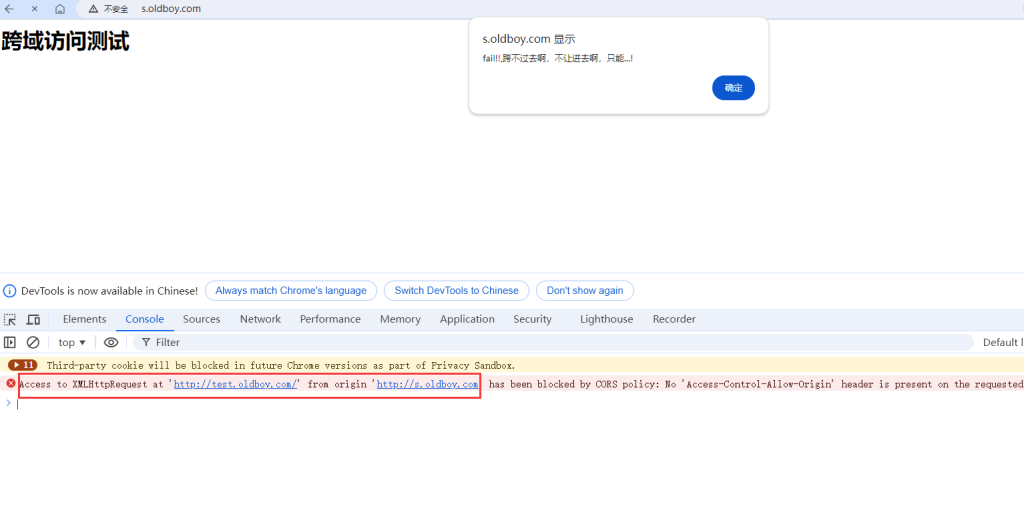
直接访问测试
s.haoshuaicong.com
在web01配置允许跨域请求
[root@web01 conf.d]# cat test.conf
server {
        listen 80;
        server_name test.haoshuaicong.com;
                root /code;
        location / {
                index index.html;
        }
    location ~ .*\.(html|htm)$ {
            add_header Access-Control-Allow-Origin *;
            add_header Access-Control-Allow-Methods GET,POST,PUT,DELETE,OPTIONS;
        }
}

[root@web01 conf.d]# systemctl restart nginx
十、CPU亲和
找处理过你请求的核心,熟人快
能使cpu各个核心均衡处理
nginx进程默认的是随机的绑定方式,有的CPU会非常繁忙,有的CPU闲置状态

[root@web01 conf.d]# lscpu | grep "CPU(s)"
CPU(s):                          4
On-line CPU(s) list:             0-3
NUMA node0 CPU(s):               0-3
[root@web01 conf.d]# ps -eo pid,args,psr|grep [n]ginx
   4002 nginx: master process /usr/   0
   4003 nginx: worker process         2
   4004 nginx: worker process         3
   4005 nginx: worker process         3
   4006 nginx: worker process         1


[root@web01 nginx]# head -4 nginx.conf

user  www;
worker_processes  auto;
worker_cpu_affinity auto;         # 开启CPU的亲和

重启Nginx生效
[root@web01 nginx]# nginx -t
nginx: the configuration file /etc/nginx/nginx.conf syntax is ok
nginx: configuration file /etc/nginx/nginx.conf test is successful
[root@web01 nginx]# systemctl restart nginx


查看核心的绑定状态
[root@web01 nginx]# ps -eo pid,args,psr|grep [n]ginx
   4224 nginx: master process /usr/   3
   4225 nginx: worker process         0
   4226 nginx: worker process         1
   4227 nginx: worker process         2
   4228 nginx: worker process         3


Nginx处理事务模型
events {
    worker_connections  1024;
    use epoll;
}
十一、总结—++—重要
面试题: Nginx优化过哪些内容
1、CPU亲和、worker进程数、调整每个worker进程打开的文件数 # 必做

2、使用额pool网络模型、调整每个worker进程的最大连接数  默认是1024  # 必做

3、文件的高效读取sendfile、nopush  # 看需求

4、文件的传输实时性、nodealy          # 看需求

5、开启tcp长连接,以及长连接超时时间keepalived # 配置如果有负载均衡

6、开启文件传输压缩gzip                # 看需求

7、开启静态文件expires缓存            # 看需求 静态文件缓存天数 N年

8、隐藏nginx版本号                  # 必做

9、禁止通过ip地址访问,禁止恶意域名解析,只允许域名访问    # 必做 空的主机头部 用IP地址访问业务

10、配置防盗链、以及跨域访问            # 看需求

11、防DDOS、cc攻击,限制单IP并发连接,以及http请求    # 看需求

12、优雅显示nginx错误页面           # 看需求

13、nginx加密传输https优化 # 必做十二、nginx通用优化配置
nginx优化总结,nginx通用优化配置文件
[root@nginx ~]# cat nginx.conf

# nginx优化总结,nginx通用优化配置文件
[root@nginx ~]# cat nginx.conf

user www;
worker_processes auto;          # 与CPU核心数一致即可
worker_cpu_affinity auto;       # CPU亲和
error_log /var/log/nginx/error.log warn;
pid /run/nginx.pid;
worker_rlimit_nofile 35535;      # 每个worker能打开的文件描述符,调整至1w以上,负载较高建议2 - 3w

events {
    use epoll;                   # 使用epoll高效网络模型
    worker_connections 10240;    # 限制每个进程能处理多少个连接,10240x[cpu核心]
}

http {
    include       mime - types;
    default_type  application/octet - stream;
    charset utf - 8;             # 统一使用utf - 8字符集

    # 定义日志格式
    log_format  main '$remote_addr - $remote_user [$time_local] "$request" '
                    '$status $body_bytes_sent "$http_referer" '
                    '"$http_user_agent" "$http_x_forwarded_for"';

    # 定义json日志格式
    log_format json_access '{"@timestamp":"$time_iso8601",'
        '"host":"$server_addr",'
        '"clientip":"$remote_addr",'
        '"size":$body_bytes_sent,'
        '"responsetime":$request_time,'
        '"upstreamtime":"$upstream_response_time",'
        '"upstreamhost":"$upstream_addr",'
        '"http_host":"$host",'
        '"url":"$uri",'
        '"domain":"$host",'
        '"xff":"$http_x_forwarded_for",'
        '"referer":"$http_referer",'
        '"status":"$status"}';
    access_log /var/log/nginx/access.log main;  # 访问日志
    server_tokens off;         # 禁止浏览器显示nginx版本号
    client_max_body_size 200m; # 文件上传大小限制调整

    # 文件实时传输,动态资源服务建议打开,需要打开keepalive
    tcp_nodelay on;
    keepalive_timeout 65;

    # Gzip压缩
    gzip on;
    gzip_disable "MSIE [1 - 6]\.";    # 针对IE浏览器不进行压缩
    gzip_http_version 1.1;
    gzip_comp_level 2;                # 压缩级别
    gzip_buffers 16 8k;                # 压缩的缓冲区
    gzip_min_length 1024;             # 文件大于1024字节才进行压缩,默认值20
    gzip_types text/plain text/css application/json application/x - javascript text/xml application/xml application/xml + rss text/javascript image/jpeg;

    # 虚拟主机
    include /etc/nginx/conf.d/*.conf;
}